OneKey GBL Data load from F14 and RDM Code Load
Prerequisite
The below prerequisites must be met before you execute the OneKey GBL Data load and RDM Code Load.
| Area | Prerequisite Details |
|---|---|
| Reltio and RDM Connections | Make sure to create Reltio and RDM connections in IDPs Entity Collection. For more details, see Connection Configuration. |
| Refresh Views | Run the pipeline MDM_Load_Refresh_Views_Customer_Master which creates/replaces one time Reltio Views used for inbound connector. |
| Notification Channels | At least one notification channel must be configured among Email ID, MS Teams and Slack. For more information, see Adding Alert Notification. |
| Data Files | All the OneKey country data files must be available as defined in OK F14 DID. For more information, see Data Interface Documents. |
Onekey Overview
Onekey is a global healthcare professionals (HCP) and institutional reference data set that is continually updated. It provides a seamless capability to capture changes and new data in any connected system. In this chapter, you will find the complete process of loading the Onekey Global Data and RDM code to Reltio.
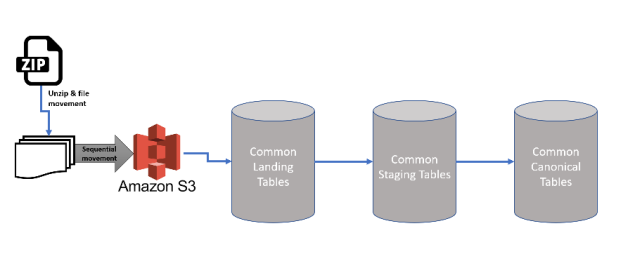
OneKey provides the country specific (US, CA, MX) data zip files through SFTP. These files are then unzipped, and the flat files are placed in a dedicated s3 location (Ex: OKGBL_F14).
Data in the flat files is loaded to the specific Landing Tables and then to the specific Staging Tables. Loading data to Landing Tables is always truncate and load. Loading data to Staging Tables is always incremental (SCD Type 1). The country specific OneKey data from the Staging Tables is transformed as per the transformation rules and then loaded to the Canonical Tables. The loading here is always incremental.
During this transformation, PROCESS DELETES are identified based on the staging column (PROCESS = D), and the scd_end_dt column in the Canonical Table will be populated to mark the DELETE records. The country specific OneKey data present in the Canonical Tables will then be posted to the Reltio customer tenant which is incremental (Only updated or newly inserted data will be posted to Reltio).
Configuration
Configure Onekey SFTP Users and S3 folders
To configure the Onekey SFTP users and S3 folders, follow the instructions given in Create and Configure SFTP Users for OK File Transfer Processs. This is a mandatory configuration which is used to copy the OK F-14 files from onekey SFTP to IDP S3 location.
Configure Onekey Global Task Group Template
-
Connect to IDP default s3 bucket and create 2 folders with names OKGBL_F14/input and OKGlobal_F14/reltio_json/input
-
Go to the folder s3://<bucket_name>/templates/product
-
Download pipeline template file MDM_Load_Reltio_OK_GBL_CT_<version>.json(MDM_Load_Reltio_OK_GBL_CT_12106.json). If multiple versions for the same pipeline exists then, consider the latest pipeline version.
-
Open the pipeline template MDM_Load_Reltio_OK_Global_CT_<version>.json in any text editor and replace all the occurrences of below place holders and then Save the file.
| Placeholder | Replaceable String |
|---|---|
| **S3_RELTIO_INBOUND** | root/mdm. Note: Do not specify only "root". it should have a folder at-least as mentioned above. |
| **RELTIO_CONNECTION_NAME** | Reltio Connection name configured in Entity Collection. For example RELTIO_MDM |
| ${bucket-name} | S3 Bucket Name for Tenant. |
| ${OneKey-SFTP-Path} | SFTP Server Remote Path for Onekey Files. |
Note: The search strings given above are case-sensitive, do not enclose with any character, replace as it is.
Import Task Group for Onekey Data Load
-
Login to IDP platform using valid credentials and go to Data Pipeline app present under Data Management.
-
Click on Task Group from Template in Data Pipeline and import the template using updated template file.
-
Process creates the pipeline task group MDM_Load_Reltio_OK_Global_CT after the successful import. This task group should be used to load onekey GBL data to reltio tenant.
Configure the Escape Option
If a data string which is enclosed with quotation marks contains \" within it, all the tasks that use s3connector plugin must be configured as given below:
-
Open the Task Group that you want to configure and then open the Task that contains the characters enclosed with \" within the data string.
-
Under the Step Configuration tab of the Task, set the Escape field value as T (True) as shown in the figure below and then click Save.

Tasks
The pipeline task group MDM_Load_Reltio_OK_Global_CT consists of the following tasks:
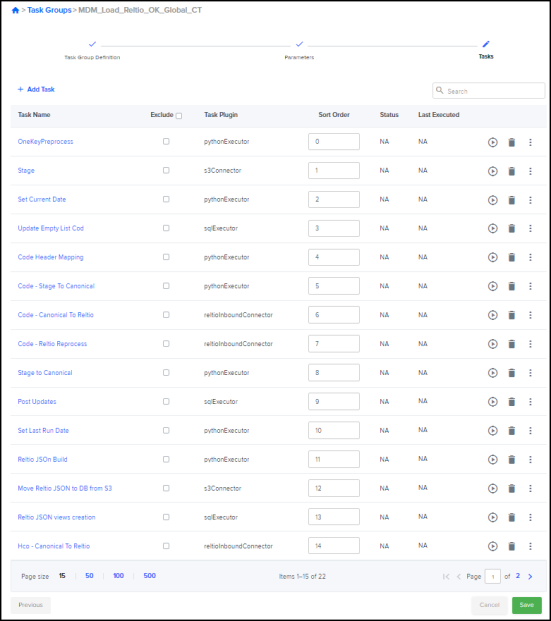
The detailed description of each task is given below:
Onekey Preprocess
This task executes various steps required to load the pipeline. see Create and Configure SFTP Users for OK File Transfer Process.
Stage
This task uses the s3Connector task plug-in to load both the initial and delta data files from s3 bucket to Landing and Staging tables using SCD Type 1 Full Refresh Method. Perform the below steps to execute this task:
-
Using WinSCP or S3 browser, login to S3 bucket and navigate to the root folder
- Place the GIF files inside the root folder/input folder.
- From IDP OA platform, open the task group MDM_Load_Reltio_OK_Global_CT and navigate to Tasks tab.
- Click RUN to execute the Stage task.
- This will load the data present in each flat file to separate Landing tables. Before each load, previous data present in the Landing tables is truncated.
- The data present in the Landing tables will then be loaded to Staging tables. For each load, data in Staging table is always either inserted or updated.
- Below are the genetic data file patterns that will be executed in the Stage task.
| FileName Patterns |
|---|
| ONEKEY_OKCSNOWFLAKE_SNOWM_OK_ALL_COUNTING_VALIDATION_RESPONSE_0000000078_20210121111203.flat |
| ONEKEY_OKCSNOWFLAKE_SNOWM_OK_ALL_COUNTING_ONEKEY_0000000078_20210121111203.flat |
| ONEKEY_OKCSNOWFLAKE_SNOWM_OK_++_WORKPLACE_SOFTWARE_VENDOR_0000000078_20210121111203.flat |
| ONEKEY_OKCSNOWFLAKE_SNOWM_OK_++_WORKPLACE_HISTO_ADD_ATTRIBUTES_0000000078_20210121111203.flat |
| ONEKEY_OKCSNOWFLAKE_SNOWM_OK_++_WORKPLACE_BED_FACTS_0000000078_20210121111203.flat |
| ONEKEY_OKCSNOWFLAKE_SNOWM_OK_++_WORKPLACE_AMA_RESIDENCY_PROGRAM_0000000078_20210121111203.flat |
| ONEKEY_OKCSNOWFLAKE_SNOWM_OK_++_WORKPLACE_ADDRESS_RELATION_0000000078_20210121111203.flat |
| ONEKEY_OKCSNOWFLAKE_SNOWM_OK_++_WORKPLACE_ADD_ATTRIBUTES_0000000078_20210121111203.flat |
| ONEKEY_OKCSNOWFLAKE_SNOWM_OK_++_VALIDATION_RESPONSE_0000000078_20210121111203.flat |
| ONEKEY_OKCSNOWFLAKE_SNOWM_OK_++_UCI_AUTHORITY_ADD_ATTRIBUTES_0000000078_20210121111203.flat |
| ONEKEY_OKCSNOWFLAKE_SNOWM_OK_++_OK_WORKPLACE_0000000078_20210121111203.flat |
| ONEKEY_OKCSNOWFLAKE_SNOWM_OK_++_OK_UCI_AUTHORITY_0000000078_20210121111203.flat |
| ONEKEY_OKCSNOWFLAKE_SNOWM_OK_++_OK_INDIVIDUAL_0000000078_20210121111203.flat |
| ONEKEY_OKCSNOWFLAKE_SNOWM_OK_++_OK_ENTITY_UCI_0000000078_20210121111203.flat |
| ONEKEY_OKCSNOWFLAKE_SNOWM_OK_++_OK_ENTITY_DATA_USAGE_0000000078_20210121111203.flat |
| ONEKEY_OKCSNOWFLAKE_SNOWM_OK_++_OK_CODE_0000000078_20210121111203.flat |
| ONEKEY_OKCSNOWFLAKE_SNOWM_OK_++_OK_ADDRESS_0000000078_20210121111203.flat |
| ONEKEY_OKCSNOWFLAKE_SNOWM_OK_++_OK_ACTIVITY_0000000078_20210121111203.flat |
| ONEKEY_OKCSNOWFLAKE_SNOWM_OK_++_INDIVIDUAL_SANCTION_RESTRICTION_0000000078_20210121111203.flat |
| ONEKEY_OKCSNOWFLAKE_SNOWM_OK_++_INDIVIDUAL_PGM_PARTICIPATION_0000000078_20210121111203.flat |
| ONEKEY_OKCSNOWFLAKE_SNOWM_OK_++_INDIVIDUAL_HISTO_ADD_ATTRIBUTES_0000000078_20210121111203.flat |
| ONEKEY_OKCSNOWFLAKE_SNOWM_OK_++_INDIVIDUAL_ADDRESS_0000000078_20210121111203.flat |
| ONEKEY_OKCSNOWFLAKE_SNOWM_OK_++_INDIVIDUAL_ADD_ATTRIBUTES_0000000078_20210121111203.flat |
| ONEKEY_OKCSNOWFLAKE_SNOWM_OK_++_ENTITY_UCI_ADDRESS_0000000078_20210121111203.flat |
| ONEKEY_OKCSNOWFLAKE_SNOWM_OK_++_ENTITY_UCI_ADD_ATTRIBUTES_0000000078_20210121111203.flat |
| ONEKEY_OKCSNOWFLAKE_SNOWM_OK_++_ENTITY_SOFTWARE_PGM_FACTS_0000000078_20210121111203.flat |
| ONEKEY_OKCSNOWFLAKE_SNOWM_OK_++_ENTITY_SOFTWARE_FACTS_0000000078_20210121111203.flat |
| ONEKEY_OKCSNOWFLAKE_SNOWM_OK_++_ENTITY_RESTRICTIONS_0000000078_20210121111203.flat |
| ONEKEY_OKCSNOWFLAKE_SNOWM_OK_++_ENTITY_RELATION_0000000078_20210121111203.flat |
| ONEKEY_OKCSNOWFLAKE_SNOWM_OK_++_ENTITY_RECEPTION_HOURS_0000000078_20210121111203.flat |
| ONEKEY_OKCSNOWFLAKE_SNOWM_OK_++_ENTITY_GPO_PROGRAM_FACTS_0000000078_20210121111203.flat |
| ONEKEY_OKCSNOWFLAKE_SNOWM_OK_++_ENTITY_GPO_FACTS_0000000078_20210121111203.flat |
| ONEKEY_OKCSNOWFLAKE_SNOWM_OK_++_ENTITY_DATA_USAGE_RESTRICTIONS_0000000078_20210121111203.flat |
| ONEKEY_OKCSNOWFLAKE_SNOWM_OK_++_ENTITY_DATA_SOURCES_0000000078_20210121111203.flat |
| ONEKEY_OKCSNOWFLAKE_SNOWM_OK_++_ENTITY_COMPANY_RESTRICTIONS_0000000078_20210121111203.flat |
| ONEKEY_OKCSNOWFLAKE_SNOWM_OK_++_ENTITY_COMPANY_EXCLUSIVITY_0000000078_20210121111203.flat |
| ONEKEY_OKCSNOWFLAKE_SNOWM_OK_++_ENTITY_COMMUNICATION_0000000078_20210121111203.flat |
| ONEKEY_OKCSNOWFLAKE_SNOWM_OK_++_ENTITY_BUSINESS_HOURS_0000000078_20210121111203.flat |
| ONEKEY_OKCSNOWFLAKE_SNOWM_OK_++_ENTITY_BRICK_0000000078_20210121111203.flat |
| ONEKEY_OKCSNOWFLAKE_SNOWM_OK_++_ENTITY_ACO_FACTS_0000000078_20210121111203.flat |
| ONEKEY_OKCSNOWFLAKE_SNOWM_OK_++_DP_SUMMARY_0000000078_20210121111203.flat |
| ONEKEY_OKCSNOWFLAKE_SNOWM_OK_++_DP_PRESENCE_0000000078_20210121111203.flat |
| ONEKEY_OKCSNOWFLAKE_SNOWM_OK_++_CODE2CODE_0000000078_20210121111203.flat |
| ONEKEY_OKCSNOWFLAKE_SNOWM_OK_++_ADDRESS_ADD_ATTRIBUTES_0000000078_20210121111203.flat |
| ONEKEY_OKCSNOWFLAKE_SNOWM_OK_++_ACTIVITY_HISTO_ADD_ATTRIBUTES_0000000078_20210121111203.flat |
| ONEKEY_OKCSNOWFLAKE_SNOWM_OK_++_ACTIVITY_ADD_ATTRIBUTES_0000000078_20210121111203.flat |
Set Current Date
By running this task, you can set the current date before you load the data using pythonExecutor plugin to identify the incremental data as of Last run date to Current time stamp.
Update Empty List Code
It is an intermediate step to add DPT value in the list code.
Code Header Mapping
In this task, data is populated in XREF table based on the OK-RELTIO header mapping and it will cleaned up and the default codes will be merged to different data available in canonical table.
Code - Stage to Canonical
In this task, Onekey codes are converted into Generic Code Formats and populated in the Canonical Table based on the Last Run Date maintained in PROCESS_LOG table.
Code - Canonical to Reltio
This task uses the reltioInboundConnector which builds the JSON message from Canonical schema RDM tables and push them into Reltio RDM tenant as per configuration.
Code - Reltio Reprocess
This task is RUN to restart or retry the load process when an error occurs during the initial load process.
Stage to Canonical
When you RUN this task, the data in a Table/View are transformed and copied to MDM Canonical schema tables based on the JSON mapping configuration. For more details refer to Staging to Canonical Copy process. Data present in the canonical schema tables must be posted to the Reltio tenant.
Post Updates
This task uses the reltioInboundConnector which builds the JSON message from Canonical schema tables and push them into Reltio tenant as per configuration.
Set Last Run Date
When you RUN this task, it uses the sqlExecutor plugin to set the load processing time as the last_run_date in the log table which helps to identify the incremental data.
Reltio JSON Build
When you RUN this task, it uses the Canonical tables to build the Reltio JSON formats for the below data and loads it to S3 bucket.
-
HCO JSON data build
-
HCP JSON data build
-
Relation JSON data build
If you want to load multi source data, navigate to the parameters tab and modify the parameter value of HCP_Query, HCO_Query or Relation_Query as necessary by adding the name of the source that you want to add separated by a comma (,). See the figure below.
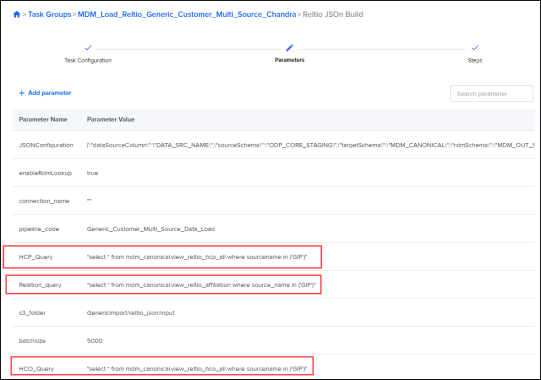
For Example: "select * from mdm_canonical.view_reltio_hcp_all where sourcename in ('GIF', 'DDD', 'IMSHCRS')".
Move Reltio JSON to DB from S3
When you RUN this task, it loads the Reltio JSON build data from S3 bucket to redshift database.
Reltio JSON Views Creation
This task is used to build the Reltio JSON views given below using the JSON build that is loaded from S3 to the database.
-
HCO
-
HCP
-
Relation
HCO Canonical to Reltio
This task loads the HCO data from Canonical to reltio using the reltioInboundConnector plugin which builds the Json message from Canonical schema tables and transfers to Reltio tenant.
HCO Reprocess
This task is RUN to restart or retry the load process when an error occurs during the initial load process.
HCP Canonical to Reltio
This task loads the HCP data from Canonical to reltio using the reltioInboundConnector plugin which builds the Json message from Canonical schema tables and transfers to Reltio tenant.
HCP - Reltio Reprocess
This task is RUN to restart or retry the load process when an error occurs during the initial load process.
Relation Canonical to Reltio
This task loads the Relation data from Canonical to reltio using the reltioInboundConnector plugin which builds the Json message from Canonical schema tables and transfers to Reltio tenant.
Relation - Reltio Reprocess
This task is RUN to restart or retry the load process when an error occurs during the initial load process.
Transliteration Fields Mapping
This is about mapping Transliteration fields to Reltio, for example, China (CN) country's first language is 'Mandarin Chinese' and is receiving the same from OK as FIRSTNAME, LASTNAME etc for HCP. Similarly, the OK team sends FIRSTNAME_2, LASTNAME_2, and so on in English.
Similarly, we have identified the English language translated countries as per OK team input and are populating that English translated value in the Transliterated FirstName, Transliterated LastName etc in Reltio and FIRST_NAME_X, LAST_NAME_X etc in the Canonical table for Individual/HCP. The same way we are doing it for HCO and address as well (please refer to the DID for all the fields).
On other way, country like Ukraine(UK) OK Team is sending FIRSTNAME_3, LASTNAME_3 etc as a english language. So these fields only mapping to Transliterated FirstName, Transliterated LastName etc in Reltio and FIRST_NAME_X, LAST_NAME_X etc in Canonical table for Individual/HCP.
We have added all the countries where OneKey provides English Transliteration. In the future, the OK team isgin sending for items that are not part of our process; the steps to add them to the pipeline are outlined below.
-
Login to IDP OA platform using valid credentials and go to Data Pipeline.
-
Find the task group MDM_Load_Reltio_OK_Global_CT.
-
Under the tasks tab, click Stage and go to the parameter tab.
-
Edit the TX_LANG_COUNTRIES parameter value and add the new country code at the end as mentioned below. (Example: \'AT\') Follow the same format.

Included Additional Columns for Ukraine
OneKey made changes to F14 format where customer can ask for additional columns in Address, Individual & Workplace Files. See the table below for list of additional columns.
By Default these columns are excluded in data pipeline.
|
ADDRESS |
INDIVIDUAL |
WORKPLACE |
|
|---|---|---|---|
|
1 |
ADR_LBL_3 |
FIRSTNAME_3 |
WKP_NAME_3 |
|
2 |
ADR_LBL_4 |
FIRSTNAME_4 |
WKP_NAME_4 |
|
3 |
ADR_LONG_LBL_3 |
LASTNAME_3 |
WKP_OFFICIAL_NAME_3 |
|
4 |
ADR_LONG_LBL_4 |
LASTNAME_4 |
WKP_OFFICIAL_NAME_4 |
|
5 |
ADDRESS_LBL_WITHOUT_NUM_3 |
MAIDENNAME_3 |
|
|
6 |
ADDRESS_LBL_WITHOUT_NUM_4 |
MAIDENNAME_4 |
|
|
7 |
ADR_EXT_LBL_3 |
MIDDLENAME_3 |
|
|
8 |
ADR_EXT_LBL_4 |
MIDDLENAME_4 |
|
|
9 |
CITY_LBL_3 |
||
|
10 |
CITY_LBL_4 |
||
|
11 |
POSTAL_CITY_LBL_3 |
||
|
12 |
POSTAL_CITY_LBL_4 |
Follow the below steps to include those columns
-
Login to IDP OA platform using valid credentials and go to Data Pipeline.
-
Find the task group MDM_Load_Reltio_OK_Global_CT and click to open it.
-
Under the tasks tab, click Stage.
-
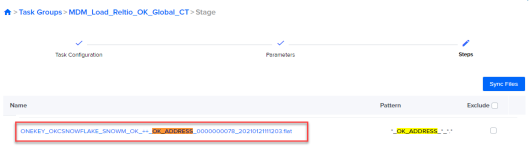
Under the Steps tab, click the flat file *_OK_ADDRESS_*_*.*. See figure below.
-
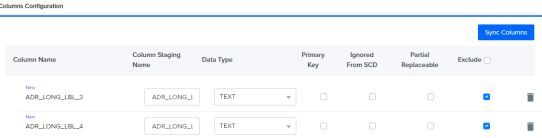
In the Column Configuration section, locate the columns listed in the table above and unselect the check box Exclude next to each of them. The columns are at the end of the configuration so if you cannot find the columns in the current page, click Next/Last page until you find them.
-
Click Save once done.
-
Perform the steps 4 to 6 again for INDIVIDUAL (pattern - *_OK_INDIVIDUAL_*_*.*) and WORKPLACE (pattern *_OK_WORKPLACE_*_*.*).
Enhancements to Address Line2
-
If the AddressLine2 data alr eady exists in AddressLine1, we are populating a null value for AddressLine2.
-
If the AddressLine2 data is not present in AddressLine1, then we can populate the AddressLine2.
-
To achieve this, we have referred to the OneKey team's provided countries list. We have parameterized this for future work. We can add or remove any country in the future based on our needs. In any case, OK team adds the new country to the list. We can go ahead and add it. Similarly, we can remove the country if OK team changes the data in the future.
-
Follow the below steps to add or remove the country from the list:
-
Login to IDP OA platform using valid credentials and go to Data Pipeline.
-
Find the task group MDM_Load_Reltio_OK_Global_CT.
-
Under the tasks tab, click Stage and go to the parameters tab.
-
Edit the ADDRESS_RULE_COUNTRIES parameter value and add the new country code at the end as mentioned below. (Example: \'AT\') Follow the same format.

-
Setting the Future Date for STA.9 Status Activities
Implemented a logic has been implemented to set the future end date for the activities with status STA.9. When the profile with status STA.9 and associated activities from OneKey with status STA.9 are created, user can set the future end date for those activities (default 90 days and it is configurable). Since the user is picking the addresses from activities, the Address relation also is set to future end date.
By default, the future end date is set to 90 days, but it is configurable.
Follow the below steps to configure the future date based on client requirements:
-
Login to IDP OA platform using valid credentials and go to Data Pipeline.
-
Find the task group MDM_Load_Reltio_OK_Global_CT.
-
In the tasks tab, click Customer Data - Stage To Canonical and go to its Parameter Tab.
-
Edit the DATE_CONFIG parameter value and add the new value as required. (Data type is number, please make sure you have pass the number only, not string).

-
Save the task group successfully.
Special Instructions for Code Migration for Those Clients Who Have Migrated from MDM1.0 to MDM2.0
Clients who are currently using MDM1.0 Informatica workflow to load OK data and migrating to MDM2.0 IDP OK pipeline. Below are the steps that need to be followed to maintain the same WS canonical codes in the RDM tenant.
-
After importing the MDM_Load_Reltio_OK_US_CT pipeline, go to Code - Stage To Canonical task and chose parameters section to modify the parameter CONVERT_CODES_TO_WS_FORMAT as true.

-
After updating the parameter value, save the pipeline.
Note:
-
By default, CONVERT_CODES_TO_WS_FORMAT can return false.
-
This code conversion can pick only the codes that can fall under the current run(delta). In order to convert all the codes available in staging, update the pipeline code's LAST_RUN_DATE in ODP_CORE_LOG.MDM_PROCESS_CONTROL_LOG table with 1900-01-01.
-
In MDM1.0 codes, the sourcecode description is concatenated with the parent code and lis code. The same change is addressed in the above pipeline. Example: CA:CPH. If parent code is null populating only code.
-
In MDM1.0 codes, the canonical code description is concatenated with the code and code description. The same change is addressed in the above pipeline. Example: WCA.CPH.DAV-Davidson Drugs, Inc.
-
Before running this task group for the first time in an IDP environment, 2 other task groups MDM_Load_Refresh_Reltio_Views_Customer_Master and MDM_Load_Refresh_Reltio_Views_RDM should be executed successfully. No need to run these task groups every time and only required to run per release.
Task group MDM_Load_Reltio_OK_Global_CT should be run only in the below scenarios.
-
For each IDL or delta onekey global data load.
-
When a latest version of this task group released in the subsequent releases.
-
If any changes made to the definition of underlying materialized views or views by client teams.
-
If underlying materialized views are invalid.
Place the input onekey data files in <bucket_name>/OKGlobal_F14/input before running the task group.
Troubleshooting
Stage task fails for UA data in redshift. See figure below.
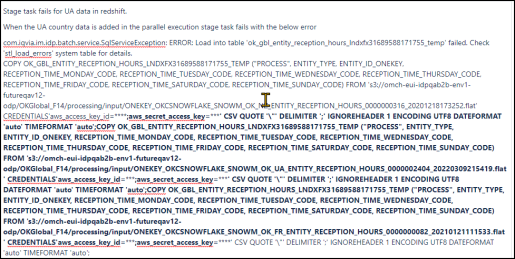
To solve this issue, you must configure the escape option. See Configure the Escape Option above.
Data Interface Document
Refer the below mentioned DID for OneKey F14 File format:
-
MDM_OK_GBL_DID.xlsx
-
OKC_Standard_Format_F14_4.xlsx
See DID of OK F14 DID in Data Interface Documents.