Informatica MDM Deployment Strategy
Introduction
This document explains the deployment strategy of Informatica MDM. Follow the steps in this document to deploy Informatica MDM to the client computers.
Prerequisites
The following are the prerequisite conditions for Informatica deployment.
| Area | Prerequisite Details |
|---|---|
|
Login |
Make sure you have the proper login credentials for logging into Informatica org. |
| Package File | Make sure you have the package.zip file before logging in to Informatica. |
| Secure Agent Details | Host Name: 3.82.125.103
User Name: ubuntu Key: .ppk file to login |
Deployment Process
Step 1: Login to Informatica
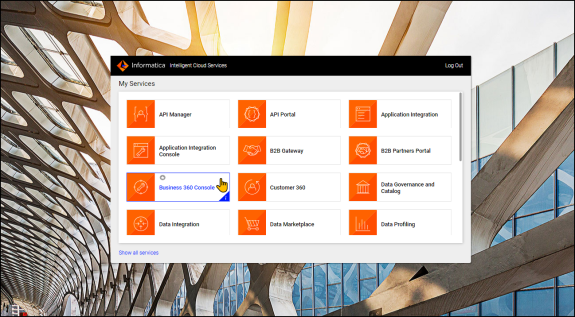
Login to the Informatica Cloud with the login credentials provided. See figure below.

Home Screen
When you login, the My services window appears. Click Business 360 Console. See figure below.
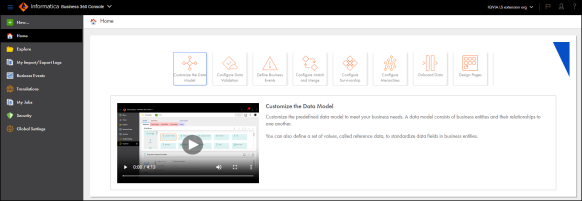
The Home screen of Business 360 Console appears as shown in the figure below.
You can see the Navigation Pane on the left side of the home screen. See figure below.
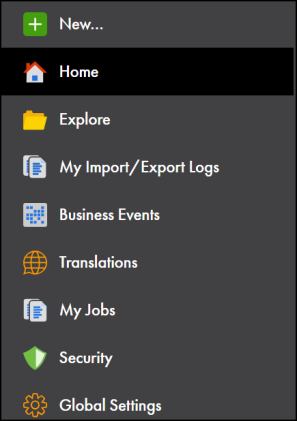
A brief description of each option on the Navigation Pane is given in the table below.
| Option | |
|---|---|

|
Creates a new Asset. |

|
Displays the Home page. |

|
This option is used to create a New Project or to access the existing projects. |

|
Displays the list of Import/Export Logs. |

|
Displays the existing list of Business Events. You can also create three types of events such as User Triggered Event, System Generated Event and Publishing Event. |
|
|
Displays language translations. |

|
Displays the list of Jobs that includes the Job instances and Job schedules. |

|
Displays the User roles and Data Access Rules. |

|
Displays various global settings. |
Step 2: Install Secure Agent
Secure Agent is responsible for securely communicating between the Informatica Cloud Repository, other cloud based applications and your local resources. It runs all the tasks and is responsible for moving data from source to target.
To install the Secure Agent on a Windows machine, you must download and run the Secure Agent installation program from the Administrator app and then register the agent.
-
To Install the secure agent in your windows machine, refer to HOW TO: Install a secure agent on a Windows machine
-
To Install the secure agent in your Linux machine, refer to HOW TO: Install a secure agent on a Linux machine
Best Practices to Follow while Installing Secure Agent
-
Have a multi-core CPU machine (4 CPUs/Logical Processors, at least), 4 CPU is computed as 1 secure agent.
-
Minimum of 16 GB RAM. Recommended to have up to 32 GB RAM to accommodate all IICS services up and running like a process server, OI Data Collector, Mass Ingestion, common integration services, File Integration Services, etc.
-
At least 250 GB disk space to run your tasks and store caches and logs with success.
-
The Secure Agent uses the HTTPS port 443 for any outbound communication and the network protocol used by secure agent communication is TLS. (For TLS supported versions, please check Cloud PAM) For Operational Systems versions supported, please check Cloud PAM for the current release.
-
In a Linux base, do not install the Secure Agent using Root user.
-
We do not recommend installing Informatica Cloud Secure Agent in the same machine that is running the Informatica PowerCenter Domain server as it might cause LIB/PATH conflicts and performance issues as the machine might not have enough memory or processor resources.
-
We do not recommend installing more than one Secure Agent in the same machine as that can cause agent ID conflicts during its registration under Informatica Cloud PODs.
-
If you need to setup proxy, remember to do it when installing the Secure Agent for the 1st time. (For more information about the proxy setup, see HOW TO: Setup Secure Agent when proxy is used KB ID: 512361) For more details, refer to IICS Minimum requirements and best practices when installing Informatica Cloud Secure Agent.
Step 3: Create Connections
You must configure the connections for running the applications, files and databases. Follow the below steps to create/configure a connection.
-
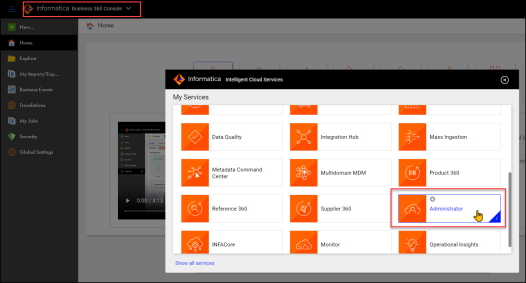
Go to Informatica Home screen and under the Informatica drop down, click Administrator. See figure below.
-
On the Administrator screen, click Connections. The existing connections are displayed.
At the top right corner of the screen, click New Connection.
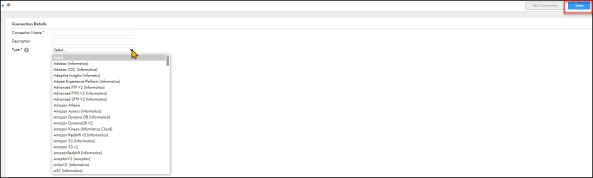
Enter the Connection Details such as the Connection Name, Description, Type and then click Save. See figure below.
A new connection is created.
Step 4: Import the Package
A package in the form of a zip file is provided which must be imported into the B360 Console. Follow the below steps to import the package.
-
On the Home screen, click Explore and then click Import.
-
The Select Import File window appears as shown in the figure below.

-
Click Choose file and then select IQVIA_MDMNextGen_Customer360.zip and then click Open.
-
To download the latest package zip file, click Download Package.
-
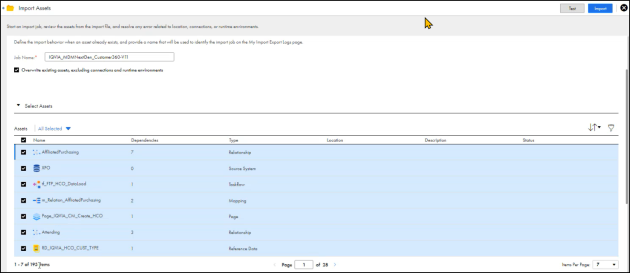
Make sure to review the Assets, Locations, Connections and Runtime Environments and Test it before you import the package file.
Review Assets
You can Select or Clear the check boxes to add or remove an asset before importing. See figure below.
Review Locations
Make sure to add the target locations as per the requirements. It is recommended to use the default target locations. See figure below.

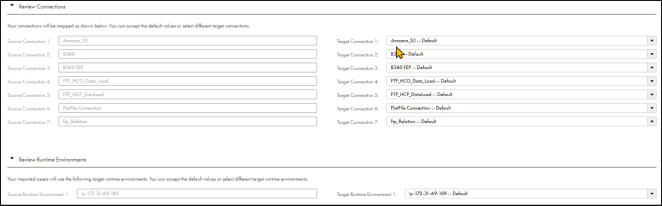
Review Connections and Runtime Environments
You can select the connections and Runtime environment as per your requirement. See figure below.
|
Note: |
If connections are imported from the package, make sure to update the username and password from administrator tab. |
-
Click Test to test the details. If you get any errors, review the details and then proceed for import.
-
Click Import.
-
The package zip file is imported successfully.
-
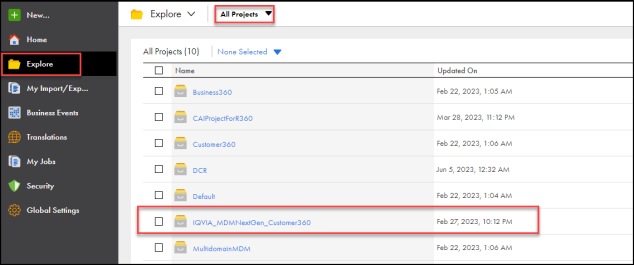
The imported file is placed under Explore->All projects, See Figure below.
-
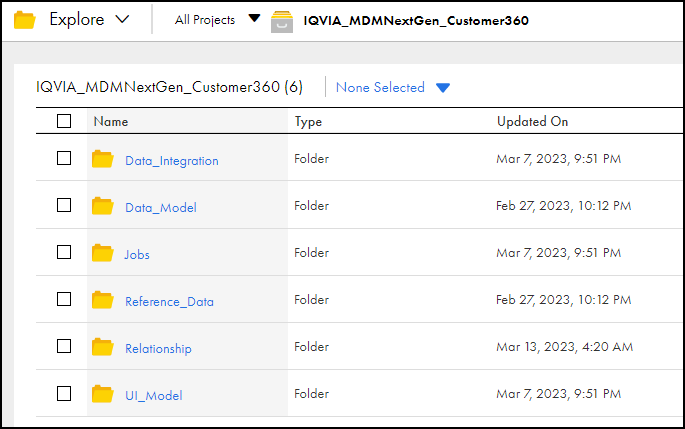
Click IQVIA_MDMNextGen_Customer360.zip to open it. It contains all the details such as Data Model, Data Integration, Jobs, UI Model etc. See figure below.
|
Note: |
|
Step 5: Create users and assign privileges
To create a new user, go to Administrator and then click Users. See figure below.

From the top right corner of the screen, click Add User. The New User screen appears as shown in figure below.
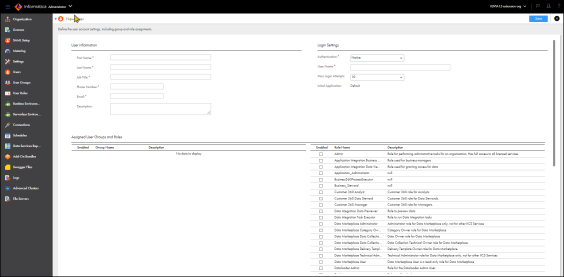
Enter the details as required and under Assigned User Groups and Roles section, select the required check boxes and click Save. This will create a new user.
Step 6: Add the Business Entities to the Customer 360 Application
-
Login to Informatica and click Business 360 Console.
-
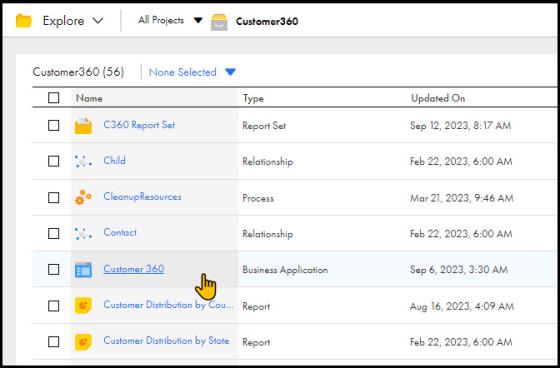
From the navigation pane, click Explore and under All projects, click Customer 360. See figure below.

-
From the Customer 360 project, click Customer 360 business application as shown in the figure below.
-
The home page of Customer 360 business application appears as below.

-
In Customer 360 business application home page, you can see three tabs. they are:
-
Model
-
Pages
-
Search
-
Add a Business Entity
Initially, when you get a new Informatica environment, you are given with default values such as person, Organisation etc. You need to add the business entities. Follow the below procedure to add a business entity:
-
Click Add at the top right corner of the screen. A field appears at the bottom to select the entity that you want to add. See figure below.

-
Click add beside the field to open Select an Asset page as shown in the figure below.

-
Click the Asset that you want to add and then click Select.
-
If you want to give the first and last name for a Business Entity, go to Customer 360 home page and then click the entity that you want to edit.
-
Under the Display Fields, add the First Name and Last Name of your choice.
-
Similarly, add HCP and HCO entities and click Save.
Configure the Pages
Under the pages tab, you have two options.
-
Create
-
View and Edit
In this tab, you can add Pages to existing entities that are added in Model tab. You can Create a page, View and Edit it and Search for something in a page. Follow the below procedure.
-
Go to Pages tab and select HCP. You will see a page with the name Page_IQVIA_CM_Create_HCP. You can assign this page to anyone you wish to assign.
-
To assign the page, click Page_IQVIA_CM_Create_HCP and under Assign To section, select the people you want to assign and then click Save. Similarly, do the same for HCO Page_IQVIA_CM_Create_HCO.
-
Go to View and Edit tab to edit the pages. Select a page and then edit the fields you want and then click Save.
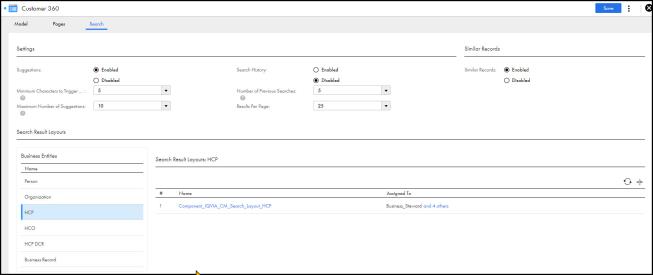
Configure the Search
-
Go to Search tab and select the search results layout for HCP or HCO and then click Save.
-
You can define the persons or roles to whom you want to Assign the search. Select the role under Assign To.
-
Click Add to add a new search results layout. See figure below.
Step 7: Publish the Task Flows
Do as below to publish the task flows.
-
Go to Explore → All Projects - IQVIAMDM NextGen_Customer360 → Data Integration.
-
Open the task flow that you want to publish and wait till it auto validates.
-
Once the task flow is validated, click Publish.