Environment Specifications and Configuration
Configure Workday Pipeline
To Configure Workday Pipeline
-
The files listed below can be found in your IDP environment's S3 bucket. Download the following files.
-
The pipeline template file named 'Workday_Employee_LEXI_Pipeline_Baseline_{{BuildNumber}}' under the /templates/lexi_workday_export folder.
-
Python scripts are available under the /Tools/lexi_python_scripts folder.
-
-
Create MQ connections in IDP.
-
Navigate to IDP → Entity Collection → ODP.Admin.ConnectionStrings.
-
Create connections for LEXI MQ one for each Lexi region, with different names for the US, EU, and APAC regions. Consider the following example.

Connection Property
Example of the value to be provided
System Name
lexi_mq_us
type
Anypoint MQ
password
ClientSecret for MQ access
description
Lexi MQ Connection for US Region
additional properties
authUrl=https://mq-us-east-1.anypoint.mulesoft.com/api/v1/authorize;queueName=iqviaQueueLexiIntake
username
ClientAcessID for MQ access
url
https://mq-us-east-1.anypoint.mulesoft.com/api/v1/organizations/
-
-
Open the Workday_Employee_LEXI_Pipeline_Baseline_{{BuildNumber}}.Json file and replace all occurrences of the below tags with appropriate values.
Pipeline Parameter
Tag
Description
Example
publish_schema
<PUBLISH_SCHEMA_VALUE>
Publish the schema name along with the database name.
format: {{DatabaseName}}.{{publish schema}}
IDP_LEXIDEV_OMCH_USV_IDP01_ENV1_DWH.ODP_CORE_PUBLISH
staging_schema
<STAGING_SCHEMA_VALUE>
Staging schema name along with the database name.
format: {{DatabaseName}}.{{staging schema}}
IDP_LEXIDEV_OMCH_USV_IDP01_ENV1_DWH.ODP_CORE_STAGING
staging_schema_only
<STAGING_SCHEMA_ONLY_VALUE>
Staging schema name only.
format: {{staging schema}}
ODP_CORE_STAGING
job_name
<JOB_NAME_VALUE>
Pipeline name for your tenant.
LEXI_WORKDAY_Employee_Export_Baseline_010001_QA
client_name
<CLIENT_NAME_VALUE>
IDP Client name. Should be same as what is populated in LEXI_IDP_CONFIG.IDP_CLIENT_NAME field. This needs to be uppercase.
WORKDAYCLIENT
n/a
<S3_CONNECTION_NAME>
s3 connection name for your pipeline.
s3_connector
n/a
<DATABASE_CONNECTION_NAME>
Default database connection name for IDP platform.
database-default
n/a
<LEXI_MQ_CONNECTION_FOR_US_REGION>
MQ Connection Name for Lexi US Region.
lexi_mq_us
n/a
<LEXI_MQ_CONNECTION_FOR_EU_REGION>
MQ Connection Name for Lexi EU Region.
lexi_mq_europe
n/a
<LEXI_MQ_CONNECTION_FOR_APAC_REGION>
MQ Connection Name for Lexi APAC Region.
lexi_mq_apac
-
Import the pipeline into the IDP QA test environment. Open the pipeline to make sure parameter values are correctly set to QA environment values.
-
Create the Lexi pipeline and metadata schema in the IDP configuration tables.
-
If you are installing Lexi pipelines for the first time in this IDP environment, then run the pipeline Lexi_Idp_Common_Schema_Baseline_{{BuildNumber}}. This will create the necessary Lexi IDP configuration tables needed for creating metadata in the next two steps. Please follow the installation instructions for Lexi_Idp_Common_Schema_Baseline.
-
Create a record in the LEXI_API_CONFIG table. This table has the URL of the ERS, CFG and WORKDAY api in the LEXI environment. Ensure that the rtf lexi_API_url is (-ext- Ex: iqvia-ts-workday-sys-1-1-q1-u.ext-lexi-pro-usv-s-pl2-p-r1.devops.lexi.com/api/').
INSERT INTO LEXI_API_CONFIG (lexi_api_name, lexi_api_url, lexi_environment_name, lexi_region, lexi_tenant_id)
VALUES ('ERS', 'https://iqvia-ts-ers-sys-1-1-d6-u.ext-lexi-pro-usv-d-pl1-p-r1.devops.lexi.com/api/', 'lexi-product-dev-us-003', 'US', '5b3f47b9-0797-8349-e053-0100007fbdab');
INSERT INTO LEXI_API_CONFIG (lexi_api_name, lexi_api_url, lexi_environment_name, lexi_region, lexi_tenant_id)
VALUES ('WORKDAY', 'https://iqvia-ts-workday-sys-1-1-q1-u.ext-lexi-pro-usv-s-pl2-p-r1.devops.lexi.com/api/', 'lexi-product-smoke-us-001', 'US', '84c4e9d0-8ff4-537d-e053-0100007fd848');
-
Create a record in LEXI_IDP_CONFIG table. This table specifies details of IDP tenants and their corresponding LEXI tenants for your client.
INSERT INTO LEXI_IDP_CONFIG (idp_region, idp_client_name, codebase, gbl_or_us,secure_view_source,connector_id,lexi_destination, lexi_tenant_code, lexi_tenant_id)
VALUES ('US','DT_DEMO_US','US','US',null,null,'lexi_mq_us','OK-DEV2T1','5b3f47b9-0797-8349-e053-0100007fbdab');
Lexi_destination is the MQ connection name for the Lexi region the tenant is present in.
-
-
If your client does not have tenants in all three Lexi region environments (US, EU, and APAC), follow the steps below.
-
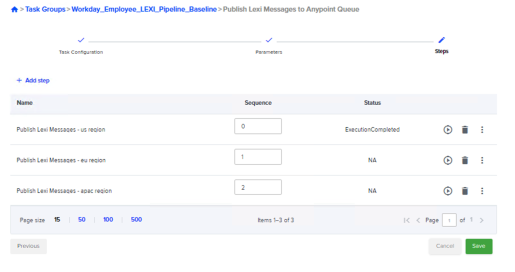
Open the pipeline job.
-
Open the task Publish Lexi Messages to Anypoint Queue.
-
Delete the steps for the regions that are not applicable to your tenant.
-
-
Install the Python script
-
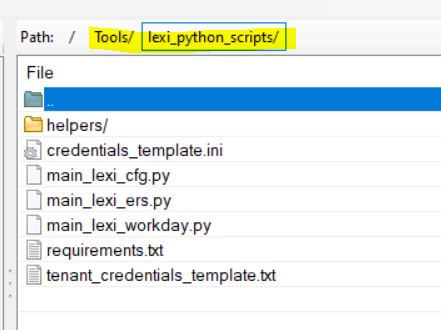
If you got the scripts through an IDP release, then Python scripts are available under the /Tools/lexi_python_scripts folder or if you got the release from an upload in the s3 folder, unzip the contents of the file lexi_python_scripts.zip, and replace the contents of the /Tools/lexi_python_scripts folder with those present in the zip file. Ensure that this is the structure of the /Tools/lexi_python_scripts folder is as seen in screen shot below.
-
If not present, make a copy of the files credentials_template.ini and tenant_credentials_template.txt and rename them to credentials.ini and tenant_credentials.txt.
-
Edit the file credentials.init to replace <DATABASE_CONNECTION_NAME> with the database connection name for your IDP environment.
[snowflake]
snowflake_connection = <DATABASE_CONNECTION_NAME>
Example:
[snowflake]
snowflake_connection = database-default
-
Edit the file tenant_credentials.txt to include the tenant_id and credentials of the lexi tenant . Credentials is a Base64 encoded string with '==' added to the end and saved as credentials.ini.
Format:
{"tenant_id1": "credentials1" , "tenant_id2":"credentials2"}Crednetials is Base64 encoded string in the format below:
{'clientId': '{{clentId}}', 'clientSecret': '{{clientSecret}}'}Example:
{ "5b3f47b9-0797-8349-e053-0100007fbdab": "eydjbGllbnRJZCc6ICc4MzllNzlhMGRlZDQ0NTVjYWQ2YTk5Zjk2OWU3YmExZCcsICdjbGllbnRTZWNyZXQnOiAnODRmYTY4NUE4NmUwNEMyMUJDQjBERDIyMmRlODgwRGQnfQ=="}
-
-
Make sure the Lexi tenant is configured for the EMPL data domain for both the source and target systems. The source system here is WORKDAY, and the targets should be OCEOSYNC and OCEOPT.
-
Finally, run the pipeline.
-
Once the job is in status ExecutionCompleted, a new row can be found in the lexi_intake_job table.
select * FROM odp_core_staging.lexi_intake_job WHERE job_name = '@job_name'.
-
Transaction_id from the table record in Step10 can be used to check the lexi side logs to verify if the messages reached the target systems.
-
At the end of the run, all the messages that were extracted in the run are moved to the @staging_schema.LEXI_OK_@client_name_MESSAGES_ARCHIVE table.
The status of the message if it is successfully published on LEXI MQ or not is available in the @staging_schema.LEXI_OK_@client_name_MESSAGES_STATUS table.
Parameters used in Workday export pipeline
|
Parameter Name |
Description |
Example ( value used in Dev) |
Is Environment Dependent? |
|---|---|---|---|
|
publish_schema |
Publish schema name along with database name format: "{{DatabaseName}}"."{{publish schema}}" |
IDP_LEXIDEV_OMCH_USV_IDP01_ENV1_DWH.ODP_CORE_PUBLISH |
Yes |
|
staging_schema |
Staging schema name along with database name format: "{{DatabaseName}}"."{{staging schema}}" |
IDP_LEXIDEV_OMCH_USV_IDP01_ENV1_DWH.ODP_CORE_STAGING |
Yes |
|
staging_schema_only |
Staging schema name only format: "{{staging schema}}" |
ODP_CORE_STAGING |
Yes |
|
job_name |
pipeline name |
LEXI_WORKDAY_Employee_Export_Baseline_010001 |
Yes |
|
client_name |
IDP Client name. Should be same as what is populated in LEXI_IDP_CONFIG.IDP_CLIENT_NAME field |
WORKDAYCLIENT |
Yes |
|
records_per_lexi_message |
Number of entities included in one lexi message |
1 |
No |
|
records_per_ers_request |
Number of entities included in one ERS Request |
100 |
No |
|
idl_date |
Process from date to be used when running the load for a tenant/country for the first time |
'1901-01-01T00:00:00' |
No |
|
system_code |
System Code that is used for IDP Onekey system in LEXI, i.e OKWS |
WORKDAY |
No |
|
EmpTypeDefault |
Default Employee Type code if employee type is null |
Sales |
No |
|
EmpGenderDefault |
Default Employee Gender value if Employee Gender is null |
Not_Declared |
No |
In IDP, the following configuration is required:
-
cfg, ers and workday URLs in Snowflake config table "ODP_CORE_STAGING"."LEXI_API_CONFIG"
-
Tenant credentials for communication to cfg and ers in the Python folder.
-
In scope country/tenant configuration in Snowflake config table "ODP_CORE_STAGING". "LEXI_IDP_CONFIG"
In Lexi, the following configuration is required:
-
Add cfg wrapper data for the sysInt wrapper type as well as CLS, ERS. See Workday CLS.
-
Routing Rules, see Configure Routing Rules
-
New system code WORKDAY is created as part of Lexi V9 and we are also re-using existing data domain code EMPL. Make sure Lexi Tenant is configured for EMPL data domain for both source and target systems.
Other configurations required:
-
AWS Setup, refer Workday Export - Python Script (Please work with IQVIA to configure this).
-
Format of Credentials, refer Format of credentials string (Please work with IQVIA to configure this).
0.1 Workday CLS
Code fields have predefined values in the source and in the target system. These values have to be loaded in the CLS table to set the relationship between both systems.
0.1.1 CLS Values
The fields and the corresponding values from workday
|
SYSTEM |
CLS_ENTITY_NAME |
CLS_CODE_FIELD_NAME |
WORKDAY VALUES (Source system) |
|---|---|---|---|
|
EXTERNAL |
User |
CountryCode |
Get from Business Object: Country |
|
EXTERNAL |
User |
UserType |
Get from Business Object: Job Family |
|
EXTERNAL |
User |
Gender |
Get from Business Object: Gender |
|
EXTERNAL |
User |
Status |
|
|
EXTERNAL |
User |
EmployeeStatusCode |
|
|
EXTERNAL |
User |
RoleCode |
Get from Business Object: Job Profile |
|
EXTERNAL |
UserAddress |
AddressType |
Get from Business Object: Communication Usage Type |
|
EXTERNAL |
UserAddress |
CountryCode |
Get from Business Object: Country |
|
EXTERNAL |
UserAddress |
Status |
|
|
EXTERNAL |
UserCommunication |
CommunicationType |
|
|
EXTERNAL |
UserCommunication |
Status |
|
|
EXTERNAL |
UserEducation |
Status |
|
|
EXTERNAL |
UserEducation |
CountryCode |
Get from Business Object: Country |
|
EXTERNAL |
UserDependent |
Gender |
Get from Business Object: Gender |
|
EXTERNAL |
UserDependent |
Status |
|
|
EXTERNAL |
UserDependent |
Relationship |
Get from Business Object: Related Person Relationship |
|
EXTERNAL |
UserDependent |
CountryCode |
Get from Business Object: Country |
|
EXTERNAL |
UserContact |
CountryCode |
Get from Business Object: Country |
|
EXTERNAL |
UserContact |
Status |
|
|
EXTERNAL |
UserContact |
Relationship |
Get from Business Object: Related Person Relationship |
0.1.2 Workday Business Objects
To Export the Business Object Values
-
Go to Workday Integration IDs functionality.

-
Select the corresponding business object, and click Ok.
-
Click
 Export to Excel to export the values.

0.2 Configure Routing Rules
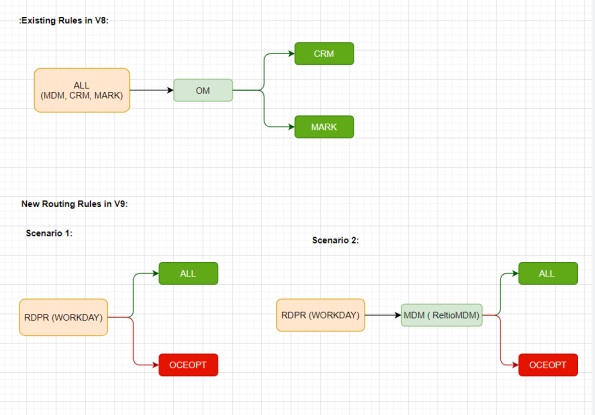
Until Version V8, Lexi had the below routing rules set for the EMPL data domain.

To maintain backward compatibility, these routing rules will be left as they are and any new clients who may want to use WORKDAY employee data extracts will need to configure routing rules for their specific tenant as below using the POST/routingRules endpoint of the cfg-sys api. After the post command, the data in the cfg_routing_rule table will look like this. Please note that below given is a sample request for the scenario where client is not using OM and using WORKDAY for EMPLOYEE data. For other scenarios, the request body needs to be adjusted to meet the client data flow requirements.

Curl Comman for cfg-sys POST /routingRules request
curl --location --request POST 'https://iqvia-ts-cfg-sys-{{hostUrlSuffix}}/api/routingRules?tenantId={{tenantId}}' \
--header 'Authorization: Basic {{authentication}}' \
--header 'Content-Type: application/json' \
--data-raw '[
     {
        "dataDomainCode": "EMPL",
        "isDataMastered": 0,
        "systemRoleCodeSource": "OM",
        "systemRoleCodeTarget": "MKT",
        "status": -1
    },
    {
        "dataDomainCode": "EMPL",
        "isDataMastered": 0,
        "systemRoleCodeSource": "OM",
        "systemRoleCodeTarget": "CRM",
        "status": -1
    },
    {
        "dataDomainCode": "EMPL",
        "isDataMastered": 0,
        "systemRoleCodeSource": "ALL",
        "systemRoleCodeTarget": "OM",
        "status": -1
    },
    {
        "dataDomainCode": "EMPL",
        "isDataMastered": 0,
        "systemRoleCodeSource": "RDPR",
        "systemRoleCodeTarget": "ALL",
        "status": 1
    },
    {
        "dataDomainCode": "EMPL",
        "isDataMastered": 0,
        "systemRoleCodeSource": "RDPR",
        "systemRoleCodeTarget": "OCEOPT",
        "status": -1
    },
    {
        "dataDomainCode": "EMPL",
        "isDataMastered": 1,
        "systemRoleCodeSource": "RDPR",
        "systemRoleCodeTarget": "MDM",
        "status": 1
    },
    {
        "dataDomainCode": "EMPL",
        "isDataMastered": 1,
        "systemRoleCodeSource": "MDM",
        "systemRoleCodeTarget": "ALL",
        "status": 1
    },
    {
        "dataDomainCode": "EMPL",
        "isDataMastered": 1,
        "systemRoleCodeSource": "MDM",
        "systemRoleCodeTarget": "OCEOPT",
        "status": -1
    }
]'