LEXI_CONSENT_Consent_Scheduler_Export_Baseline
Import Pipeline
To import LEXI_CONSENT_Consent_Customer_Import_Baseline Pipeline
-
User can find pipeline files in S3 bucket under /templates/product/LexiTemplates folder. Download the template pipeline files below.
-
LEXI_CONSENT_Consent_Scheduler_Export_Baseline_{{BuildNumber}}.json - This file needs to be imported based on the Env Type mentioned in the User Instruction section and only if IQVIA Consent is integrated.
-
-
Python scripts are available in S3 bucket under /Tools/lexi_python_scripts folder.
-
Import/Export S3 folder path details.
-
Consent/Iqvia/Export/CNST/ExportedFiles: This folder must be created by the user. The consent system generates export files under this folder. The same path needs to be configured in the IQVIA Consent System.
-
Consent/Iqvia/Export/CNST/processed: Plugin generated this folder. This folder contains the files which are processed from the ExportedFiles folder.
-
Consent/Iqvia/Export/CNST/error: Plugin generates errors in this folder if any error occurs while processing.
-
Consent/Iqvia/Import/CNST/ImportedFiles: This folder must be created by the user. It contains import files, and the same path needs to be configured in IQVIA Consent System.
-
Consent/Iqvia/Import/CNST/processed: Plugin generated this folder. This folder contains the files which are processed from the ImportedFiles folder.
-
Consent/Iqvia/Import/CNST/error: Plugin generated this folder. This folder contains the original files from the ImportedFiles folder if any error occurs while processing.
-
Consent/Iqvia/Import/CNST/ImportErrors: This folder must be created by the user. The same path needs to be configured in IQVIA Consent System.
-
Consent/Iqvia/Import/CNST/Working: This folder must be created by the user. It holds intermediate prepared import files. The same path needs to be configured in IQVIA Consent System.
-
-
Setup Global connections
-
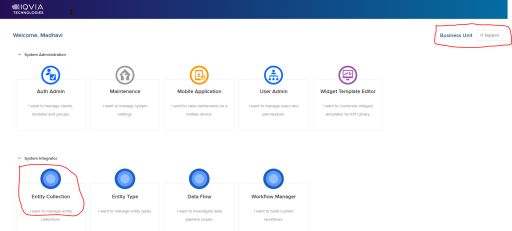
Create a new connection for CLS and Consent by using the Data pipeline maintenance feature.
-
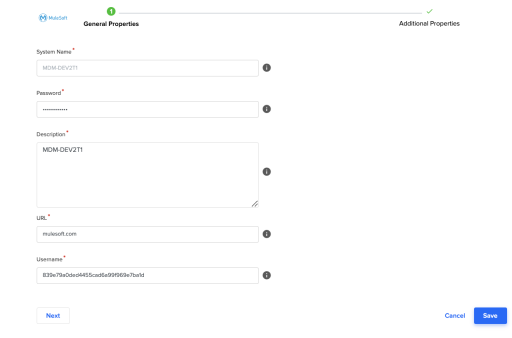
Select Mulesoft Anypoint from the list of connections.
-
Provide the CLS API username and password as mentioned below and click Next. Then, provide dummy values and save. This connection name will be used as part of the CLS API metadata in the LEXI_API_CONFIG table.
-
Open the LEXI_CONSENT_Consent_Scheduler_Export_Baseline_{{BuildNumber}}.Json file and replace the placeholder values (<placeholder>) with actual values as per the above Pipeline section mentioned parameter list.
Parameters
Parameter Description Default Base Value
Example app_id
<APP_ID>
This holds the Consent System's Application APIs unique ID.
This value needs to be captured from Consent System GUI → Login System Admin user → Click menu item API Settings.
Users has to setup the Consent System API authentication application from GUI, those values needs to be used while calling Consent APIs.
User has to setup the Consent System APIs access application through Consent System GUI. Same values needs to be set while importing this template.
entity_name
This holds Entity Name
"Consent"
User should not change this value.
job_name
<JOB_NAME_VALUE>
This is fixed value for Job name
"LEXI_EXP_CONSENT"
User needs to take the name of job while importing if user while importing what job name provided.
{ "systemName": "0854b23e-b4fb-4165-b08e-aff8b5a32a2d", "name": "LEXI_EXP_OCEP", "description": "LEXI_EXP_OCEP", "createdBy": "nagaprasad.pai", "templateContent": [ValidateDateFormat
Date to validate format which needs to be regular expression format
'[0-9]{4}-[0-9]{2}-[0-9]{2}T[0-9]{2}:[0-9]{2}:[0-9]{2}.[0-9]{3}Z'
Generally this is fixed but needs to checked with Product team before changing this value.
dbConnection
<DATABASE_CONNECTION_NAME>
This is Snowflake Database connection string name
"database-default"
User needs to update as per defined name under Admin Connections.
method
This holds operation method while sending to Consent system request
"F"
User should not change this value without contacting Product team.
type
This holds Type of Pipeline, like Import or Export
"exp"
Either imp or exp. User should not change this value.
External_CompanyId
<EXTERNAL_COMPANYID>
This holds Root Company External ID (Business Unit ID / Country Code) (this is same called as Laboratory Code)
"oce"
User has to make sure this value updated while importing the pipeline with right Company External ID.
User has to set while importing pipeline.
system_code
This is holds system code of source system.
"CONSENT"
User should not change this value.
domain_code_cnst
This holds domain code
"CONSENT"
User should not change this value.
publish_schema
<PUBLISH_SCHEMA_VALUE>
This holds IDP publish schema name.
"IDP_LEXIDEV_OMCH_USV_IDP01_ENV1_
DWH.ODP_CORE_PUBLISH"
User has to set the right value while importing the pipeline template.
It contains schema name and table name.
idl_date
This is used for IDL case when first data loaded to set initial Date and time to user to fetch data from source system.
"'1901-01-01T00:00:00'"
This is used only when no record for correspond client and tenant, country, system and without any success records in LEXI_INTAKE_JOB table
Generally this is not required user to change it.
client_name
<CLIENT_NAME_VALUE>
This is used to identify the jobs based on client name in table name prefix and lexi_idp_config table data query
"CNSTCLIENT"
User has to make this value updated as per client name while import the pipeline.
action_type
This holds action type value which is required for Consent System Export request.
"Process"
User should not change this value
lab_code
<LAB_CODE>
This holds the Consent System's Application APIs Lab Code unique ID(External Company ID). This needs to be collected from Consent System team.
Users has to setup the Consent System API authentication application from GUI, those values needs to be used while calling Consent APIs.
User has to setup the Consent System APIs access application through Consent System GUI. Same values needs to be set while importing this template.
app_name
<APP_NAME>
This holds the Consent System's Application APIs unique name.
This value needs to be captured from Consent System GUI → Login System Admin user → Click menu item API Settings.
Users has to setup the Consent System API authentication application from GUI, those values needs to be used while calling Consent APIs.
User has to setup the Consent System APIs access application through Consent System GUI. Same values needs to be set while importing this template.
custom_field2
This is place holder to add client specific custom fields
"--Lexi custom fields"
as TopicIdentifer
ValidateCustomFieldMsgConsentDetail
This is used to add additional client specific custom fields
||''
To add new field Fld validation message
ValidationCustomFieldConsentDetail
This is used to add additional client specific custom fields
or(1=2)
To add new field Fld where condition to consider for validation
staging_schema
<STAGING_SCHEMA_NAME>
Staging schema name
"IDP_LEXIDEV_OMCH_USV_IDP01_
ENV1_DWH.ODP_CORE_STAGING"
targetConnectionName
<DATABASE_CONNECTION_NAME>
It's same as dbConnection parameter
ValidationCustomFieldConsent
This is used to add additional client specific custom fields
or(1=2)
To add new field Fld where condition to consider for validation
ValidateCustomFieldMsgConsent
This is used to add additional client specific custom fields
||''
To add new field Fld validation message
DERIVED_COLS_JSON
This is used to add additional column to the staging table create by Json loader connector.
Expression to add with additional column.
'[{"column" : "column name", "expression": "column name", "dataType" : "string", "ignoreSCD": true } , {"isArchive": false}]'
'[{"column" : "FILENAME", "expression": "FILENAME", "dataType" : "string", "ignoreSCD": true } , {"isArchive": false}]'
custom_field1
This is place holder to add client specific custom fields
"--Lexi custom fields"
as ClientBusinessUnitIdentifier
source
This is holds system code of source system.
"CONSENT"
User should not change this value.
DateFormat
This is format of the date which user can change different format if requires
'YYYY-MM-DDTHH24:MI:SS.FF3Z'
s3 python script path
<s3_PYTHON_SCRIPT_PATH>
This holds the python scripts used for Consent
root/lexi_python_scripts
sourceFolder
<SOURCEFOLDER_PATH>
This holds the export consent file folder s3 path
Consent/Iqvia/Export/CNST/ExportedFiles
This folder has to created by user and the path needs to be configured in IQVIA Consent System.
<COUNTRY>
This holds country value for plugin configuration
"US"
s3_connection
<S3_CONNECTOR>
It's same as s3Connection parameter
<FILE_PATTERN>
This is parameter to set consent export file pattern
Consent_*_*.json
retryCount
retry count for consent system connection through python script
3
User can give count for retrying connection.
-
If you are installing Lexi pipelines for the first time in this IDP environment, then run the pipeline LEXI_IDP_Common_Schema_Baseline_{{BuildNumber}} and import the LEXI_IDP_Common_Schema_Baseline_{{BuildNumber}}.Json pipeline into IDP. Refer to LEXI_IDP_Common_Schema_Baseline for instructions on how to import.
-
First, import the LEXI_IDP_Consent_Common_Schema_Baseline_{{BuildNumber}}.Json pipeline into IDP. Refer to LEXI_IDP_Consent_Common_Schema_Import_Baseline for instructions on how to import. Then, run the pipeline LEXI_IDP_Consent_Common_Schema_Baseline_{{BuildNumber}}.
-
Import the LEXI_CONSENT_Consent_Scheduler_Export_Baseline_{{BuildNumber}}.Json pipeline into IDP.
-
Create the schema needed for the Lexi pipeline and metadata in IDP configuration tables LEXI_API_CONFIG and LEXI_IDP_CONFIG for your Tenant.
-
Create a record in the LEXI_API_CONFIG table. This table has the URL of the Consent API in the LEXI environment. Below is a sample insert statement, user needs to provide right value and insert it.
INSERT INTO LEXI_API_CONFIG (LEXI_API_NAME,LEXI_API_URL,LEXI_ENVIRONMENT_NAME,LEXI_REGION,LEXI_TENANT_ID,LEXI_CONNECTION_NAME)
VALUES('CONSENT','<https://<Consent Host>/api/index.php','<lexi Env Name>','<CompanyExternalId>','<Tenant Id>','<CONSENT_CONNECTION_NAME>')Note:
This will not validate unique constraints.
-
Create a record in the LEXI_IDP_CONFIG table. This table specifies details of the IDP tenant and corresponding LEXI tenant details for your user client.
INSERT INTO LEXI_IDP_CONFIG(idp_region, idp_client_name, codebase, gbl_or_us,secure_view_source,connector_id,lexi_destination, lexi_tenant_code, lexi_tenant_id)
VALUES ('<CompanyExternalId>','<Client Name>','<<CompanyExternalId>>',null,null,null,null,'<Tenant Code>','<Tenant ID>');Note:
This will not validate unique constraints.
-
-
Install python script
-
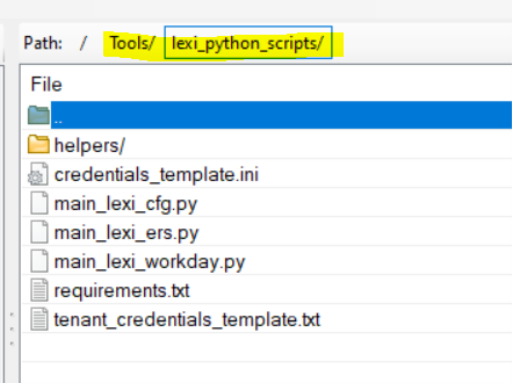
If you obtained the scripts through IDP release, then the python scripts are available under the '/Tools/lexi_python_scripts' folder. If you got the release from an upload in the s3 folder, unzip the contents of the file 'lexi_python_scripts.zip', and replace the contents of '/Tools/lexi_python_scripts' folder with that present in the zip file. Make sure that the structure of the '/Tools/lexi_python_scripts' folder is as seen in the screenshot below.
-
If they are not present, make a copy of the files 'credentials_template.ini' and 'tenant_credentials_template.txt' files and rename them to 'credentials.ini' and 'tenant_credentials.txt'.
-
Copy the 'tenant_credentials_template.txt' file and rename it as 'consent_credentials.txt' and replace <tenant_id> with the actual Tenant ID and <Consent access token> or if 'consent_credentials.txt' already exists, then replace the values in that file.
The access token needs to be copied from the Consent GUI. The user needs to log in to the Consent system with a System Admin user and click the menu item API Settings.
-
Copy the tenant_credentials_template.txt file and rename it tenant_credentials.txt to include the tenant_id and credentials of the Lexi tenant. Here Credentials is Base64 encoded of CLS Mulesoft API access.
Format:
{"tenant_id1": "credentials1" , "tenant_id2":"credentials2"}Crednetials is Base64 encoded string in the format below:
{'clientId': '{{clentId}}', 'clientSecret': '{{clientSecret}}'}Example:
{ "5b3f47b9-0797-8349-e053-0100007fbdab": "eydjbGllbnRJZCc6ICc4MzllNzlhMGRlZDQ0NTVjYWQ2YTk5Zjk2OWU3YmExZCcsICdjbGllbnRTZWNyZXQnOiAnODRmYTY4NUE4NmUwNEMyMUJDQjBERDIyMmRlODgwRGQnfQ=="}
-
-
All pipeline users can schedule or run a pipeline at any time directly from the pipeline interface.
-
For instructions on how to run the pipeline, please refer to the IDP Operation Guide.


